This blog post will introduce tool Terraform, which we use for deploying testing environments in YSoft. We will cover following topics:
- What is Terraform?
- How does it work?
- Example of use
What is Terraform?
Terraform is a command line tool for building and changing infrastructure in a safe and efficient matter. It can manage resources on most of the popular service providers. In essence, Terraform is simply a tool that takes configuration files as input and generates an execution plan describing what needs to be done to reach the desired state. Do you need to add another server to your cluster? Just add another module to your configuration. Or redeploy your production environment in a matter of minutes? Than Terraform is the right tool.
How does it work?
Infrastructure as a code
Configuration files that define infrastructure are written using high-level configuration syntax. This basically means that blueprint of your production or testing infrastructure can be versioned and treated as you would normally treat any other code. In addition, since we are talking about code, the configuration can be shared and re-used.
Execution plan
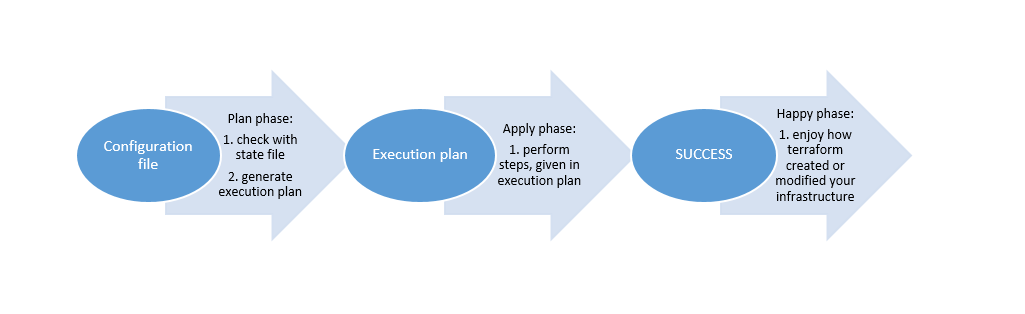
Before every Terraform execution, there is planning step, where Terraform generates an execution plan. The execution plan will show you what will happen when you run an execution (when you apply the plan). This way you avoid surprises when you manipulate with your infrastructure.
Terraform state file
How does Terraform determine the current state of infrastructure? The answer is the state file. State file keeps the information about all the resources that were created by execution of the given configuration file. To assure that the information in state file is fresh and up to date, Terraform queries our provider for any changes of our infrastructure (and modifies state file accordingly), before running any operation, meaning: for every plan and apply, Terraform will perform synchronization of a state file with a provider.
Sometimes this behavior can be problematic, for example querying large infrastructures can take a non-trivial amount of time. In this scenarios, we can turn off the synchronizing, which means the cached state will be treated as the record of truth.
Below you can see the picture of the whole execution process.
Example of use
In our example, we will be working with the azure provider. The example configuration files can be used only for the azure provider (hence the configuration files for different providers may and will differ). In our example, it is also expected, that we have set up terraform on our machine and appropriate endpoints to provider beforehand.
Step 1: Write configuration file
The presented configuration file has no expectations regarding previously created resources and it can be executed on its own, without the need to create any resources in advance.
The configuration file that we will write describes following resources:
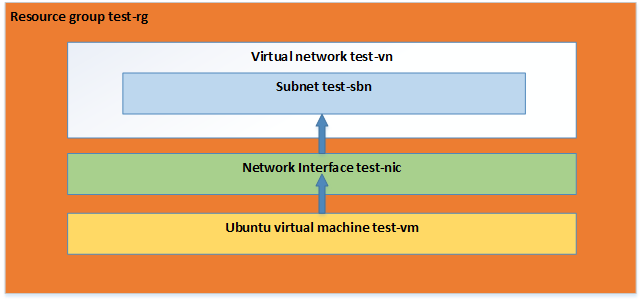
Now we create an empty directory on the machine where we have installed terraform and within we create a file with name main.tf. The contents of the main.tf file:
provider "azurerm" {
  subscription_id = "..."
  client_id       = "..."
  client_secret   = "..."
  tenant_id       = "..."
}

resource "azurerm_resource_group" "test" {
  name     = "test-rg"
  location = "West US 2"
}

resource "azurerm_virtual_network" "test" {
  name                = "test-vn"
  address_space       = ["10.0.0.0/16"]
  location            = "West US 2"
  resource_group_name = "${azurerm_resource_group.test.name}"
}

resource "azurerm_subnet" "test" {
  name                 = "test-sbn"
  resource_group_name  = "${azurerm_resource_group.test.name}"
  virtual_network_name = "${azurerm_virtual_network.test.name}"
  address_prefix       = "10.0.2.0/24"
}

resource "azurerm_network_interface" "test" {
  name                = "test-nic"
  location            = "West US 2"
  resource_group_name = "${azurerm_resource_group.test.name}"

  ip_configuration {
    name                          = "testconfiguration1"
    subnet_id                     = "${azurerm_subnet.test.id}"
    private_ip_address_allocation = "dynamic"
  }
}

resource "azurerm_virtual_machine" "test" {
  name                  = "test-vm"
  location              = "West US 2"
  resource_group_name   = "${azurerm_resource_group.test.name}"
  network_interface_ids = ["${azurerm_network_interface.test.id}"]
  vm_size               = "Standard_DS1_v2"

  delete_os_disk_on_termination = true

  storage_image_reference {
    publisher = "Canonical"
    offer     = "UbuntuServer"
    sku       = "16.04-LTS"
    version   = "latest"
  }

  storage_os_disk {
    name              = "myosdisk1"
    caching           = "ReadWrite"
    create_option     = "FromImage"
    managed_disk_type = "Standard_LRS"
  }

  os_profile {
    computer_name  = "hostname"
    admin_username = "testadmin"
    admin_password = "Password1234!"
  }

  os_profile_linux_config {
    disable_password_authentication = false
  }
}
Step 2: Planning the execution
Now we browse into a directory with our main.tf file and we run command terraform init, which initializes various local settings and data that will be used by subsequent commands.
Secondly, we run command terraform plan, which will output the execution plan, describing which actions Terraform will take in order to change real infrastructure to match the configuration. The output format is similar to the diff format generated by tools such as Git. If terraform plan failed with an error, read the error message and fix the error that occurred. At this stage, it is likely to be a syntax error in the configuration.
Step 3: Applying the plan
If terraform plan ran successfully we are safe to execute terraform apply. Throughout the whole “apply” process terraform will inform us of progress. Once the terraform is done, our environment is ready and we can easily check by logging in to our virtual machine. Also, our directory now contains file terraform.tfstate file, which is state file that corresponds to our newly created infrastructure.
Conclusion
This example was only a very simple one to show how configuration file might look. Terraform offers more on top of that. Configurations can be packed into modules, self-contained packages that are managed as a group. This way we can create reusable parametrizable components and treat these pieces of infrastructure as a black box. Besides that, Terraform can also perform a provisioning of VM and much more.